Yep, that's right. I have my work cut out for my this week - although, I'll be the one doing all the cutting! Some friends are in a band and every year they put on a charity gig to raise money for Kanzi Kibera, a schools project in africa. Anyway, we are very much involved with the band and the church who is raising the money and so, me and my friend, Carole, are selling cards. Which means we've got to make cards. Lots of them.
On Monday, I got started by doing some tea-bag folding whilst working through my 'Films I need to watch' list. If you haven't tried tea-bag folding, it's very fiddly but quick enjoyable to do. After folding for most of the day, I started to make some more top hats to put onto Mad Hatter cards (I was very organised and looked through my photos to decide which cards I could make lots of). Yesterday was all about the embellishments, as my supply of card blanks was running dangerously low after all the crafting I did at uni. I finished off by making some kimonos out of the origami paper one of my Japanese friends gave me as a present before she left.
Yesterday, I was able to get into town and buy those much needed card blanks (The Works is amazing for them!) and I was able to start making the cards.
I have just finished those (10 in total) and am about to start with my Alice in Wonderland cards and then move onto my silhouettes.
Busy day ahead! I will post photos later on when I have finished them all and I am admiring my handywork! ;D
Wednesday, 4 July 2012

Monday, 2 July 2012
Busy Weekend
 This weekend saw me making plenty of cards for various occasions, including my first proper order - my brother was talking about my cards to one of his friends who needed one for her mum's birthday later this week. The theme for this card was The Cat in the Hat.
I began by looking at the character on-line and sketching out some ideas. I decided to make (yet another) silhouette card but highlight his famous hat and bow-tie.
To make it, I drew out my cat onto black card and finished it off by adding a red and white paper hat (and tie) with pen detail.
I finished the card with silver stars and a happy birthday foam sticker.

After I had shown it to mum, she wanted one for her boss' birthday, her boss who happens to like cats. This one was more or less the same, with small changes in the details.
My third card of the weekend was a new baby card for our brand new family member (a distant relation). This one required a bit of inspiration. I finally came across the perfect template.
 I used some pink and cream spotted paper for the rabbit, finishing it off with a little pink ribbon and pen features. The card itself was decorated with a strip of cream ribbon and some pink gingham tape with a 'congratulations' foam sticker (there is a lack of 'new baby' or 'baby girl/boy' stickers in my stash).
My other creation was for a family friend who was starting a new job. This was a new theme for me, having never made a 'good luck on your new job' card before. So I hit my magazines once more. Unfortunately, they were limited and all included stationary or shirts and ties which wasn't what I was looking for. I did have one idea though and that was shoes. My friend, Jan, absolutely adores shoes, so I decided to make them the focus of the design.
Again, I chose to do a silhouette card but used brightly coloured paper from the Retro Rose range for the shoes and detail on the card. I am so happy with the design and love the colours. I think it definitely ranks up there with my favourite makes. I used Word to help me write the message, but typing it out, finding the right font and copying it onto the card. I didn't just want to write good luck but I was able to come up with this sentiment, which I thought matched my card perfectly.

Saturday, 30 June 2012
CAS-ual Fridays

A very quick post for this week's challenge, which was to create a card which featured two circles.

I decided to use the Retro Rose range by Laurence Llewelyn Bowen for this project. I really love the bright colours and bold patterns in this range I picked up some papers, vellum and chipboards a while back and although I have used them on a couple of occasions, I keep forgetting about them.
I finished the card off by adding a 'happy birthday' peel off.
Saturday, 23 June 2012
CAS-ual Fridays

Just a quick entry for this week's CAS-ual friday challenge. Pretty in Pink is the theme.

I made this card for my best friend a couple of years back. I found the quote on another card and thought it was perfect. I typed it up on Word, added some colour and printed it out. I finished the card with patterned paper and a paper bra topper, decorated with a piece of paper doily. I added the 17 as a final detail in gold gel pen. I'm glad to say that the card got a chuckle from: it had the desired effect.
Thursday, 21 June 2012
Green and Purple
As I am now home from university for the summer, last night I went around to my friend, Carole's for a second evening of card making. Overall, the evening could have been more productive: I made four cards in total, two of which we're made for the sake of making, while trying to think up what to make next.

My first card was, finally, my Cheshire Cat card.
For this I decided to use really 'out there' colours to show how crazy this cat is. The face was made with purple paper, yellow paper for the eyes and some thin white card for the mouth. The detail was drawn in black pen. Like my previous Alice in Wonderland cards, I used the same font to write a suitable message.
The purple and green on this card gave me an idea for my next project . .

The Joker
This card took much longer to make than other cards but I think it was definitely worth it. I created a template and cut out the pieces on various pieces of coloured paper. When cutting out his tie, I used black pen to define the edges and then ended up shading it in as well. To make it match, I added outlines and shading to his waist coat and jacket lapels. I like the way it makes it look like it's just come out of the comic books. I tried to use brads for the buttons but it didn't let the paper lie flat so I used more orange paper and black pen. I used foam pads for the tie and lapels to make them stand out from the front. This would definitely be a card worth making again, I can think of a few Batman fans among my friends, and with the new Batman film coming out soon . . .
I may even had a closer look at other comic book heroes for more inspiration.
 A couple years ago, I made a birthday card for a comic book fan. For this, I simply found a suitable image, carefully cut it out and stuck it onto bright red card. I printed of a message and did the same. For the background, I found a section of a Batman comic, faded it slightly and printed it out. I tore of a corner and stuck it to the card front.
I then finished it off by decorating the envelope to match using more red card and the remaining comic book paper.

My first card was, finally, my Cheshire Cat card.
For this I decided to use really 'out there' colours to show how crazy this cat is. The face was made with purple paper, yellow paper for the eyes and some thin white card for the mouth. The detail was drawn in black pen. Like my previous Alice in Wonderland cards, I used the same font to write a suitable message.
The purple and green on this card gave me an idea for my next project . .
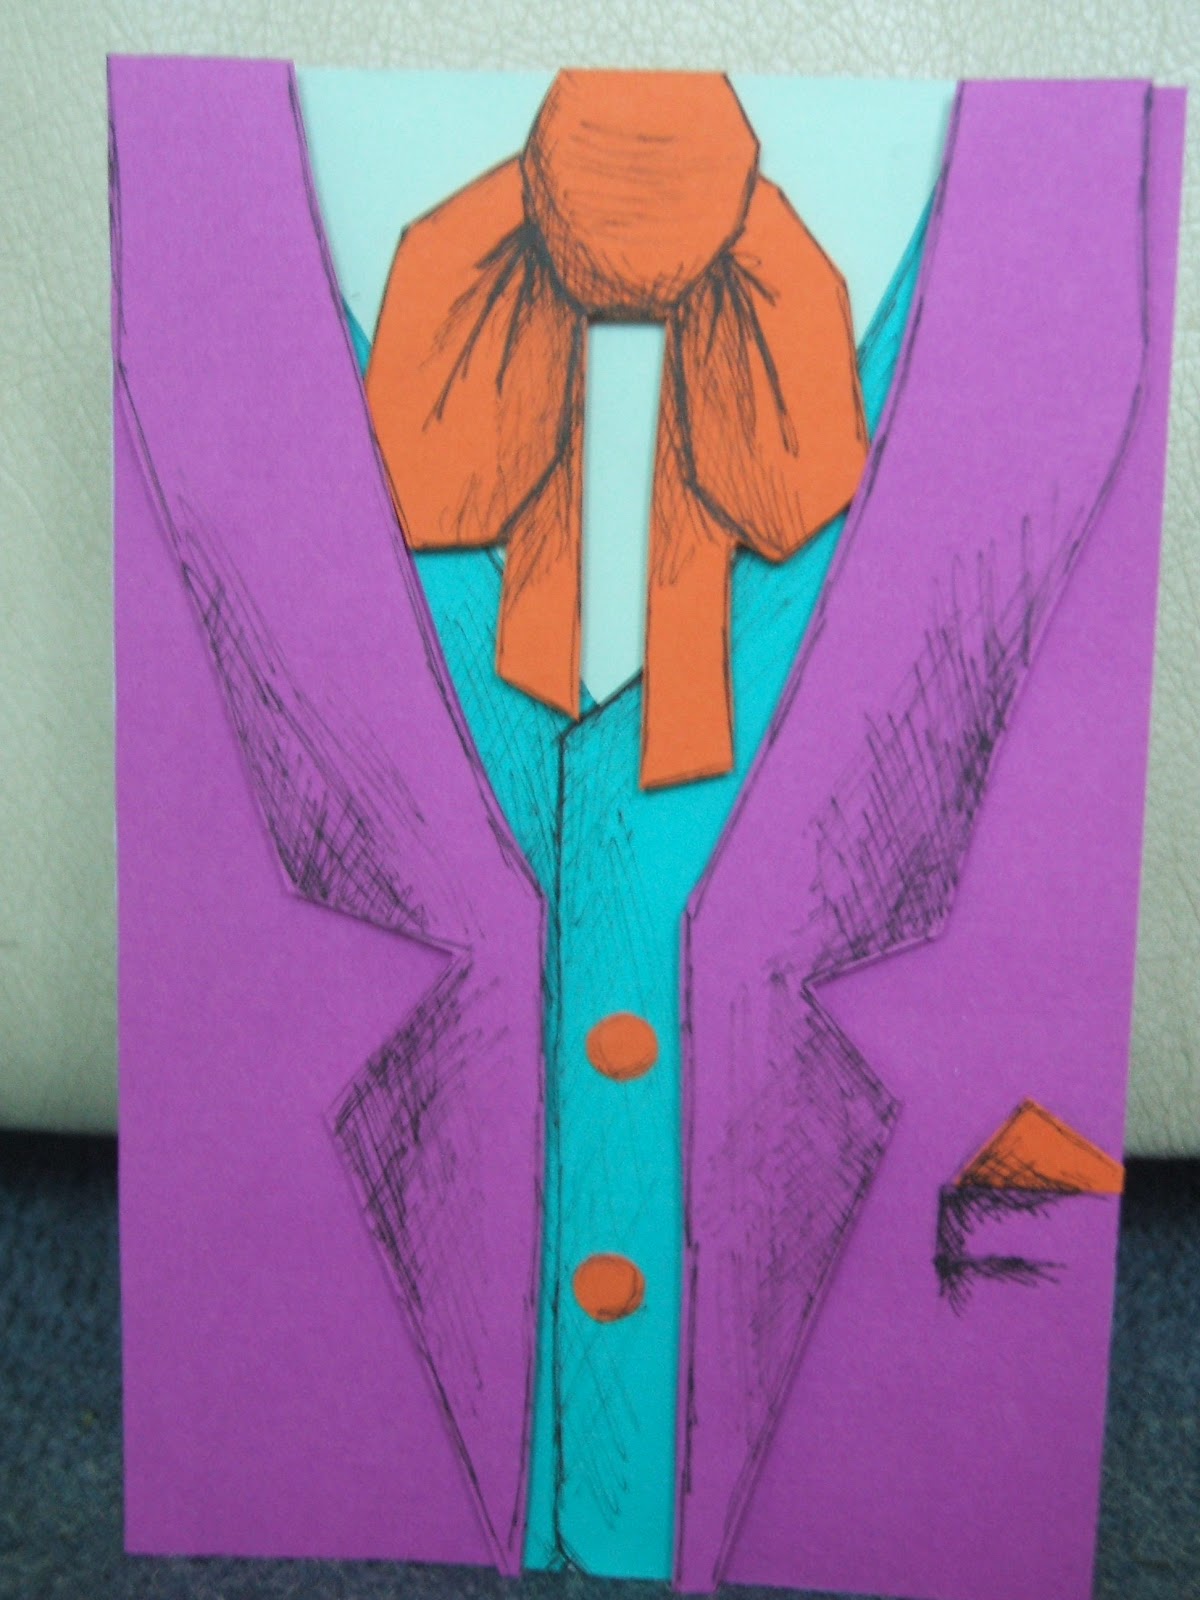
The Joker
This card took much longer to make than other cards but I think it was definitely worth it. I created a template and cut out the pieces on various pieces of coloured paper. When cutting out his tie, I used black pen to define the edges and then ended up shading it in as well. To make it match, I added outlines and shading to his waist coat and jacket lapels. I like the way it makes it look like it's just come out of the comic books. I tried to use brads for the buttons but it didn't let the paper lie flat so I used more orange paper and black pen. I used foam pads for the tie and lapels to make them stand out from the front. This would definitely be a card worth making again, I can think of a few Batman fans among my friends, and with the new Batman film coming out soon . . .
I may even had a closer look at other comic book heroes for more inspiration.
 A couple years ago, I made a birthday card for a comic book fan. For this, I simply found a suitable image, carefully cut it out and stuck it onto bright red card. I printed of a message and did the same. For the background, I found a section of a Batman comic, faded it slightly and printed it out. I tore of a corner and stuck it to the card front.
I then finished it off by decorating the envelope to match using more red card and the remaining comic book paper.
Friday, 15 June 2012
CAS-ual Fridays

So, this week's challenge is Clear as Day: create a Clean and Simple project using vellum or acetate.

This card was made for my animal-loving Great Aunt's 80th birthday a few years back. I used acetate at the bottom of the card to make my hand written message stand out. I used My Mind's Eye Spring papers for the elephants and finished it with some pink organza ribbon to hide the join between card and acetate. The beads were a final finishing touch and kind of give it a Moroccan/African flavour.
While on the subject of acetate, after this project was a success, I had a go at creating cards for male friends using acetate. The first, I made this week for a friend at university but this inspiration came from the other one I made a last year. They were so simple to make. Using black card and papers and ribbons of different shades of blue (although any other colour would work as well) creates a bold design. Especially, as is the case with the second card, when a white card blank was used. The white shows through the acetate to give a bold contrast.

 The one thing I had to keep in mind, however, was where I wrote on the inside!
Monday, 4 June 2012
Jubilee Fever
It wouldn't be right for me, being British, to not write something about the Queen's Diamond Jubilee. Yes, the bank holiday buzz hit my halls up in Manchester and as I write this I am sat watching the Jubilee concert after a day of making fairy cakes for our street party tomorrow. But enough of the festivities and more about the cards.
As it is the jubilee weekend, I felt the need to make some cards with a British flavour. However, I think I went off at a tangent slightly. From British to tea parties to Alice in Wonderland.
 I began with the obvious one for a tea party: the Mad Hatter. Really simple, just a black card top hat with ribbon and that trademark label. You can't tell by the photo but I raised the embellishment using the usual foam sticky pads.
For the text, I cheat and open up a Word document. I have used this for a few of my cards. I write the message, choose the font I want to use and copy it on to my card. It's worked in the past and I'm sure it'll work in the future.


After that card, the creative juices were really flowing, so much so that I had to jot my ideas down before I forgot them! Next up was the Queen of Hearts. This was done in much the same way: black card, red card, raised on foam pads and a greeting from Word. (The font used on these cards was Galeforce BTN). I was struggling with the dormouse card. I knew what I wanted but was totally lost for the message. In the end I went for a quote. Twinkle, twinkle,
little bat. . . .
I owe the tea cup template to the magazine I read, Papercraft Inspirations (I think I'm ok to mention them on my blog).
I couldn't create a set of Alice in Wonderland without including the White Rabbit and as always, he was running late so what better message that one for a belated birthday? I used a brad and a bit of thread for his pocket watch flying out behind him. Feel the need to work my template for the next time. And yes, there will be a next time, hopefully with more characters - I'm still thinking of a way to do that cheeky Cheshire Cat . . . . . watch this space.
As it is the jubilee weekend, I felt the need to make some cards with a British flavour. However, I think I went off at a tangent slightly. From British to tea parties to Alice in Wonderland.
 I began with the obvious one for a tea party: the Mad Hatter. Really simple, just a black card top hat with ribbon and that trademark label. You can't tell by the photo but I raised the embellishment using the usual foam sticky pads.
For the text, I cheat and open up a Word document. I have used this for a few of my cards. I write the message, choose the font I want to use and copy it on to my card. It's worked in the past and I'm sure it'll work in the future.


After that card, the creative juices were really flowing, so much so that I had to jot my ideas down before I forgot them! Next up was the Queen of Hearts. This was done in much the same way: black card, red card, raised on foam pads and a greeting from Word. (The font used on these cards was Galeforce BTN). I was struggling with the dormouse card. I knew what I wanted but was totally lost for the message. In the end I went for a quote. Twinkle, twinkle,
little bat. . . .
I owe the tea cup template to the magazine I read, Papercraft Inspirations (I think I'm ok to mention them on my blog).
I couldn't create a set of Alice in Wonderland without including the White Rabbit and as always, he was running late so what better message that one for a belated birthday? I used a brad and a bit of thread for his pocket watch flying out behind him. Feel the need to work my template for the next time. And yes, there will be a next time, hopefully with more characters - I'm still thinking of a way to do that cheeky Cheshire Cat . . . . . watch this space.
Subscribe to:
Posts (Atom)