Sunday, 29 September 2013

3D Cards: The Zig-Zag

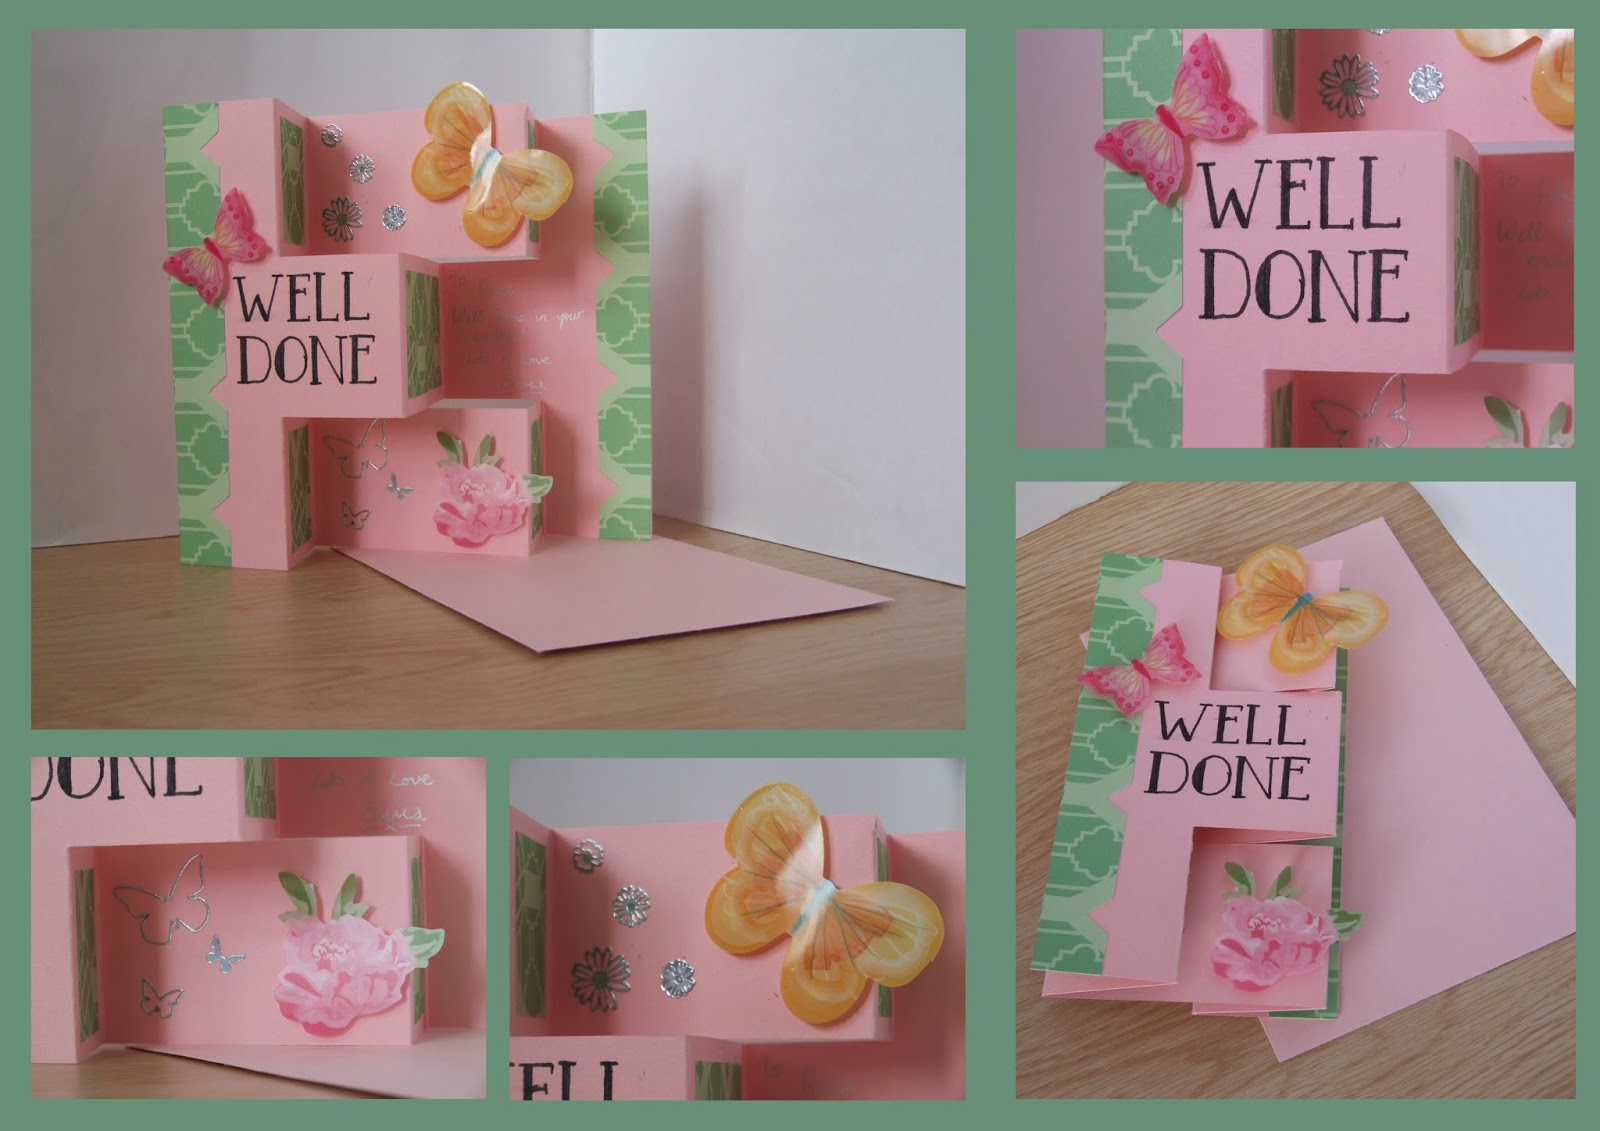
My second 3D card was also a well done card but this time it was for my sister on receiving her GSCE results.

I used the same blog as last time for my inspiration although this time I opted for a zig zag card. I started with a sheet of pink cardstock which, after scoring and cutting in the appropriate places, I decorated with paper from the Retro Rose range by Llewelyn Bowen (ones I have used before and plan on using again and again.)

I also decorated the card with acetate butterflies and flowers, keeping with the colour scheme of pink, green and yellow. I added a bit of sparkle in the way of peel off flowers before handwriting the sentiment in a retro font.

I really liked the way the paper was already shaped at the edges; it made for an interesting border to the card. 

The written message for the card, you can probably just about make it out in the photo, went on the back panel of the card so that when it was closed, it was hidden behind the sentiment. Making 3D cards, I've realised, gives more scope for design by allowing you to create a new level. I not only have to think about what the card looks like on the front but also when it is closed - just out of the envelope - and when it is open - stood up on display. I wanted the butterflies to stand out a bit and in order to do that, I had to make sure that while they weren't sticking out too much that the card didn't fit in the envelope, they weren't hidden by the panel in front when the card was closed. It was a similar situation with the peel offs in that I didn't want to see them when the card was closed (this meant I had to do a bit of re shuffling)

Overall, I think this one was simpler than my previous one but that doesn't mean that it didn't have it's own design challenges!

Saturday, 14 September 2013

3D Cards: The Next Dimension

Those of you who read my last post (yes it was a month ago - sorry), you would have seen I had started dabbling in 3D cards, beginning with my easel card. Since then, I have made four more cards, using different techniques and over the next few posts, I'm going to be writing about them.

But before I go any further, credit where credit is due, I came across a great blog with tutorials for all sorts of 3D cards so if anyone is looking for some ideas, I recommend that you take a look over at Beccy's Place.

My first card was briefly mentioned in my previous post but I couldn't say any more at the time as it was going to be for my brother on receiving his A level results and getting into university, which he hadn't at the time and I didn't want to jinx it (he did really really well and is moving into his halls at Birmingham University next weekend).


I should probably explain that he is off to study music and mathematics, which explains the music notes and the numbers. This card needed tutorials from Youtube but it is very similar to the Diamond Fold Card on the aforementioned blog. 
The colours are the colours of the university and I used music patterned vellum to decorate the base. The dog stamp was from my magazine (where the original inspiration came from) and I used gold and blue stars to finish it off. I decided to go really over the top and I used wire to have springy notes, stars and numbers at the top of the card. The stamped sentiment needed my sister's opinion but felt it was appropriate for someone who is about to take their step out into the (semi-)real world. The idea was that as well as being a 'well done in your exams' card, it would also be a 'good luck at uni' card and would be something that he could take with him to put on his book shelf or desk.
You may be wondering where the message goes on a card like this? Well, it's not shown in these pictures but it is on the back of the card. The whole thing folds flat, allowing it to go into a normal envelope. A couple of things I would say, and I think I pushed this one to the limit, is make sure the folds are crisp in order for it to stand up and to make sure not to overload the diamond, again, for it to stand up. Too much weight, or not distributed enough, will stop it from standing up straight but this is something that is better shown than explained - a bit of experimentation is needed.

Wednesday, 14 August 2013

Easel Cards

Good Morning!

Recently I was inspired to make some Easel Cards. I had seen them before and don't get me wrong, the ones I saw looked amazing, but I felt that they weren't really my style and far to elaborate. 

However, one of the projects in the latest issue of my magazine really inspired me to have a go. I even came up with a design then and there (but that's for another time, shhh). So, Sunday afternoon saw me scouring the internet searching for how to actually make these 3D cards and after sitting through a couple of YouTube videos and finding a couple of sites, I managed to make my first ever Easel Card.

It was so simple to make and would allow me to start working my way through my massive pile of paper/card and the envelopes that are given back to me (nothing wrong with a bit of recycling here and there!). This card, as you can probably guess, is a triple easel card. I had some tall envelopes spare so I made it to fit one of those.
I cut some cardstock in half lengthways, meaning I can make two cards from one sheet of A4. Folded it in half lengthways and when I opened it up, folded on side lengthways again, so that the edge came to the middle. As this is a triple easel card, I cut to folded side into three up to the centre fold. And then all I had to do was decorate.

The only other bit you have to remember is a stopper on the base of the card which will hold the easels in place. I chose to stamp a floral image and used sticky pads to raise it up enough to hold the easels up. I've seen some where the sentiment is used as well.


I did struggle to decorate the card but that was mainly due to finding papers and embellishments that matched the cardstock I started with. In the end, I opted for some felt and paper flowers and a stamped faerie image, coloured in with pen. I'll admit I was lazy when adding the sentiment and decided to use a peel off rather than stamp on but I think the silver, along with the glitter on the flower and the tiny butterflies just finishes it off.

I also love the way that these cards just fold flat, ready to go in the envelope.

I might make a tutorial for these when I make my next Easel Card (which will be very soon).

Wednesday, 31 July 2013

CAS-ual Fridays

Now, lets see if I can remember how to do this. After starting these challenges last summer, as soon as I got back to university I didn't have time and eventually completely forgot about them. So it's high time that I got back to doing them!

cfc110


This week's challenge was to create a card which featured a number. Funnily enough, I had only this morning found out it was one of my friend's birthday today and not only that but his 21st. I always like to highlight important birthdays - making sure that an 18 or 21 etc features on the card somewhere. Therefore, I decided to make a 21st Birthday card although I have no idea when we're going to meet up next and I have no idea how to get it to him - in this case it's the thought that counts!
I am also at that age of 21st birthdays - with my own coming up in October (scary scary!) so it's probably about time that I started to get some ideas together for special cards.


With my aim to make a male card, I used my 'Masculine' papers from Dovecraft.

My first card was a bit of an accident. I cut numbers out of patterned paper to use on my 21st card but I saw how I could also use the inverse for another card. Unfortunately(?) I had the numbers the other way around so instead of 21, it's a 12 but I think it still makes for an effective birthday card. I then finished it off with some chipboard shapes (from the same range) and a stamped sentiment. 


My second card (the one I actually planned to make) used the cut out numbers from the spotty paper. I then finished it off with patterned paper strips, another chipboard circle and a stamped sentiment.

I really like how I could very easily re make this card for a different age and use different paper to make a completely different card - using floral paper and and flower instead of the circle for a girlie card.
Correct me if I'm wrong but I think I've just created my first layout! 


On a slightly different note, following on from my last post, my new craft box (still needing a name by the way!) was put through it's paces. Well, it hasn't fallen apart yet although I've decided that it needs wheels or a lazy Susan (or even both!) underneath just to finish it off. Not only was I able to reach everything easily, it also makes tidying up easy as I can just close the drawers or put the stamp back in it's box and slot it into space as soon as I am done with it which therefore means, despite just making a couple of cards, my desk is as clear (if not clearer) as it was before I started. *insert victory dance here* 

We'll see how long it takes for the novelty to wear off!

Monday, 29 July 2013

The Craft Cube 5000

I am one of those people that can spend hours (and probably a lot of money) in shops that sell stationary and storage items. So, me making a Pinterest account last week was absolute heaven. 

As a student crafter, I have lots of stash and very little space, when I am at uni, and not much more when I am back at home (mainly due to the clutter in my room). So what I really need is a portable, small-ish storage unit that allows me to put as much of my stash as physically possible. Oh, and being a student and having little to no money, ridiculously cheap. Hmm. 

The model in it's former glory (I won't go
into details as to what it is)
So last week, as I was lying in bed about to go to sleep, I decided that I was going to actually sort out my room and organise my stash, with Pinterest being my source of inspiration. I had an old model from my first year of architecture that had no purpose but to sit on my shelf, gather dust and take up space so I resolved to use this somehow.

The following morning, several Pinterest pages at the ready (storage, craft storage, DIY storage, DIY craft storage, . . . ) I began sorting and making.

The first image of genius I found was a way of storing clear stamps . . . .using CD boxes! All you have to do it take out the interior (the actual CD part of the box) and put the stamps in. I was definitely having that idea - my stamp collection just kept building up and because all the sheets were different sizes, I had no real place to store them so they always took up lots of space. But now that I got hold of some CD cases, they are organised, compact and easy to get to.

As for my big storage project though, the first thing to do was actually get rid of the little model as I only wanted the wooden frame in order to make my box. I thought through several ideas, including just making some trays for everything to sit in. I wanted to make sure that as much of the space available was used and each section was designed to hold something specific. That way, it would be easy to find everything when I needed it as well as making the most of what was available. Already, I knew some of the things that were going to go into my box: my stamps in their new boxes, my ink pads and all my chipboard pieces.
Previously, all my chipboard shapes were in one box (the boxes used, gradually growing in size as my collection grew quicker than it shrunk!) which made for a right pain when I was either looking for something in particular or looking for inspiration. So I decided I was going to separate them and store them separately. In order to do this, I had to make some little drawers for them to sit in my frame.

I'll admit it was a little bit trick to get them to fit - with the frame being handmade as well (and being made by me, not exactly square). However, after a bit of trimming and a bit of force, I got the two draws to fit.

I went on to make a third drawer, this time to store paper and the peel off sheets that were living in my craft tote/caddy.

As for my stamps and the ink pads, the pads themselves fitted beautifully within the top of the frame and also allowed the perfect amount of space for the CD boxes to be stored next to them. I didn't have enough CD's to warrant using the whole side of the box for them so the space that was left was just right for my pens - both my Sharpies and my ProMarkers (more architecture than card making) as well as the odd gel pen and coloured pencils. The teeny tiny gap between my pens and inks allowed me to slot my stamping block in.

I had used card to turn the frame into a box but didn't want to waste the inch of space created by the frame. During my clear out, I came across several pairs of jeans that had worn away in awkward places and therefore couldn't be worn again so I cut these up and (kind of) neatening them up by hemming them, I creating pockets around the other three sides so that I could store card blanks and other bits and pieces.

The very last bit of my box was going to be a fourth drawer but was impatient to get it finished and didn't know what to actually put in it so I just left it as a shelf big enough to store some of my business-y bits - my order book, sketch book etc - although maybe in the future, I will do something with it. Who knows?

While it definitely is nowhere near shop quality - lack of wrapping paper (I ran out, ok!), my lack of ability to hem in a straight line and the tight fit of the drawers meaning I will be forever gingerly opening them so as not to break them - it is custom made for me and my craft stash. It's something that I would never be able to find in the shops and except the cost of the CD boxes and a tube of UHU, it was completely free. Not bad really then!

The finished box

Pockets made from old jeans create pockets for my card
blanks and papers as well as protect the sides

Stamp storage - my perfectly organised stamps in their
new home

From the top - ink pads, stamping block, pens and
pencils, stamps, business cards

The bottom two drawers organise my chipboard pieces,
top draw has paper and peel offs and the shelf has my
business bits

Monday, 22 July 2013

Little Crafter, Big Field

Well, I don't know about you but the weather up in North Wales has been glorious - save for this morning when it clouded over but I blame dad getting the cover off the BBQ for that one. I've just spent the whole week hiking in the Lake District but before I went off on my hols, I (finally) got myself a stall at a local event.

Now I'm not saying I've reached that point where I was a big fish in a little pond (because I know for a fact that I have most definitely not) but I was certainly well out of my depth as I soon realised.

The event in question was the Abergele Carnival and because I worked in a cafe in the town before heading off to university, I knew about it and on more than one occasion had been down to the park to wander around and grab an ice cream after work. So I thought it would be a great chance to sell my cards: a local event, the possibility of bumping into people I knew, the weather promised to be good, I had my newly found confidence from New Directions with regards to networking and talking to people. I thought it was going to be a good day.

Oh how wrong was I.

It turns out that I still have a heck of a lot to learn about fairs and especially outdoor ones. I was just too small. I blended into the background and no one really looked twice. My location was slightly unfortunate although I though being placed next to the pageant "arena" (or whatever you want to call it), lots of people would be coming past later in the afternoon, including the carnival queens themselves. However, theatre group to the left of me, children's charity to the right (as the song goes sort of goes), I was nearly invisible - especially next to the big Spongebob Square Pants and Piglet cuddly toys.


My biggest problem in terms of presence was that while my table and display was practically the same as Victoria Baths II, a field is much bigger than a swimming baths or a village hall. I am literally too small to be outdoors for now at least. I have a long way to go before I attempt an event of that size again. Next year? We'll see. I'm definitely not ruling it out just yet.

Thursday, 4 July 2013

New Directions: Day 2

It's probably about time I got on with this entry!

The first activity of day two was right up my street. The challenge was to build a tower using only paper. The fewer sheets we used, the more profit, the quicker we built it, the more profit and the higher we built it, the more profit. We had some time to prototype our tower and then we had to build it. I was part of the design/building team while some of the other team members calculated how much profit we were going to make. Our tower, although only reaching 2 ft (ish), contained very few sheets and was fast to build. Consequently, we came third. I think the main lesson learn here was that you don't always have to come up with the biggest idea, just a good one. Great things come in small packages and all that!

The main part of the day followed from Monday's brainstorming session. We had to come up with a product that would help people reduce the amount of energy they use. At the end of the day, we would then be pitching our ideas to a panel of judges made up of entrepreneurs. 
It felt a little bit like The Apprentice again, but this time I was determined not to be competitive and we came up with a great idea and we worked really well as a team.

When it was time to pitch, we ended up going last but this did however mean that we could look at other people's pitches and see what we were up against. One thing that I did realise was how much my public speaking had developed since coming to university. We have to present our work on a regular basis so talking to large groups of people no longer fazes me in the way it used to. As well as not being nervous, I know how to make a presentation. This was something I took for granted but I saw that there were some groups that didn't present as well as the other. It was really interesting to see and a bit of a motivator.
Our turn soon came along and although we didn't win, I felt that we performed really well as a group and we did a good presentation. Everyone got involved with speaking and making sure that we told the panel all the information about our product which left time for some more in depth questions which we also managed to answer really well to back up our idea. 


Overall, it was a really good couple of days and as well as giving me the chance to network and chat to other people like me, I think it's also given me the confidence to go ahead and take the next step as a small business: registering. This is something that I will be doing when I get back to Manchester, where I can get support and advice from Innospace and the Business School. It may not be a new direction but this workshop definitely gave me a push in the right one.