Showing posts with label peel-offs. Show all posts

Tuesday, 9 September 2014

Technique of the Week: Silhouettes

Due to the faff of a new city, new job, new flat and a new routine, my new blog posts have suffered. I aim to do better.

This week, I'm focusing on my silhouette cards. These are my go-to designs when I'm sometimes stuck for ideas. My first silhouette cards were a set of Christmas cards back when I was more focused on calligraphy than paper craft and featured different Christmassy shapes with a calligraphed message.


The original silhouette card: I was inspired by my magazine (again) and made this using black paper and finishing it with silver pen detail and white thread strings. I also learnt that day that stitching paper is not the easiest thing to do and vowed never to do it again. I lied. This is probably one of my favourite templates to use and the last card I made before moving also featured it (albeit the evolved version).


I make sure to always have a stash of black card or paper just in case I have the urge.

The key to a good silhouette card is to keep it simple. Because the card has no real detail, it needs to be distinguishable and it needs to be clear what the design is. From my own experience, I know how difficult it can be to judge - I know what it's meant to look like - so I usually borrow my brother or sister and get them to identify the design!
By using black, it lets me use a whole range of other colours. I found white in particular looks particularly bold. I always like to finish them off with a bit of sparkle by using a silver (or gold) pen and peel-offs. 

These two cards used the off-cuts from each other. Anyone who knows the Death Note manga series will know who these two characters are. I was particularly pleased with them because they reflect the characters and their relationship with each other.


This one was a repeat of a card I made for a friend starting a new job. It's still one of my favourite designs because of the way the silhouette stands out against the pink and just makes the shoes pop. (I was particularly happy with the writing as well)

Wednesday, 13 November 2013

3D Cards: The Cascade

With it being a big birthday for my mum back in September, I of course had to do a special card and while looking for inspiration, I found a really unusual design that I just had to try.


When sorting through my craft stuff before I came back to uni, I found my oriental papers that I had completely forgotten about. This teamed with black card (because my stash of card stock is shocking), meant that I could create a really bold design. The red has got a bit of a pink tinge to it but I think it works really well. I accidentally cut both black pieces of card the same way even though they mirror each other. This meant that one side is white instead of black but I think it brightens the card up a bit rather than just having it completely black (well, you know what I mean!). I had some oriental peel-offs so I got to stick these to the paper and cut around them - a technique I really enjoy.

The message goes on a little piece of card that slots in the middle of the card. For this I just cut a rectangle of black card, decorated it with some patterned paper and finished it with a couple of peel-offs. Then, when it was time to write the message, I just used a white gel pen although I expect gold would also look really good.

I think I mixed my orientals with this card (tut tut) but apart from this, I would definitely say it's one of my favourite makes to date.


Sunday, 29 September 2013

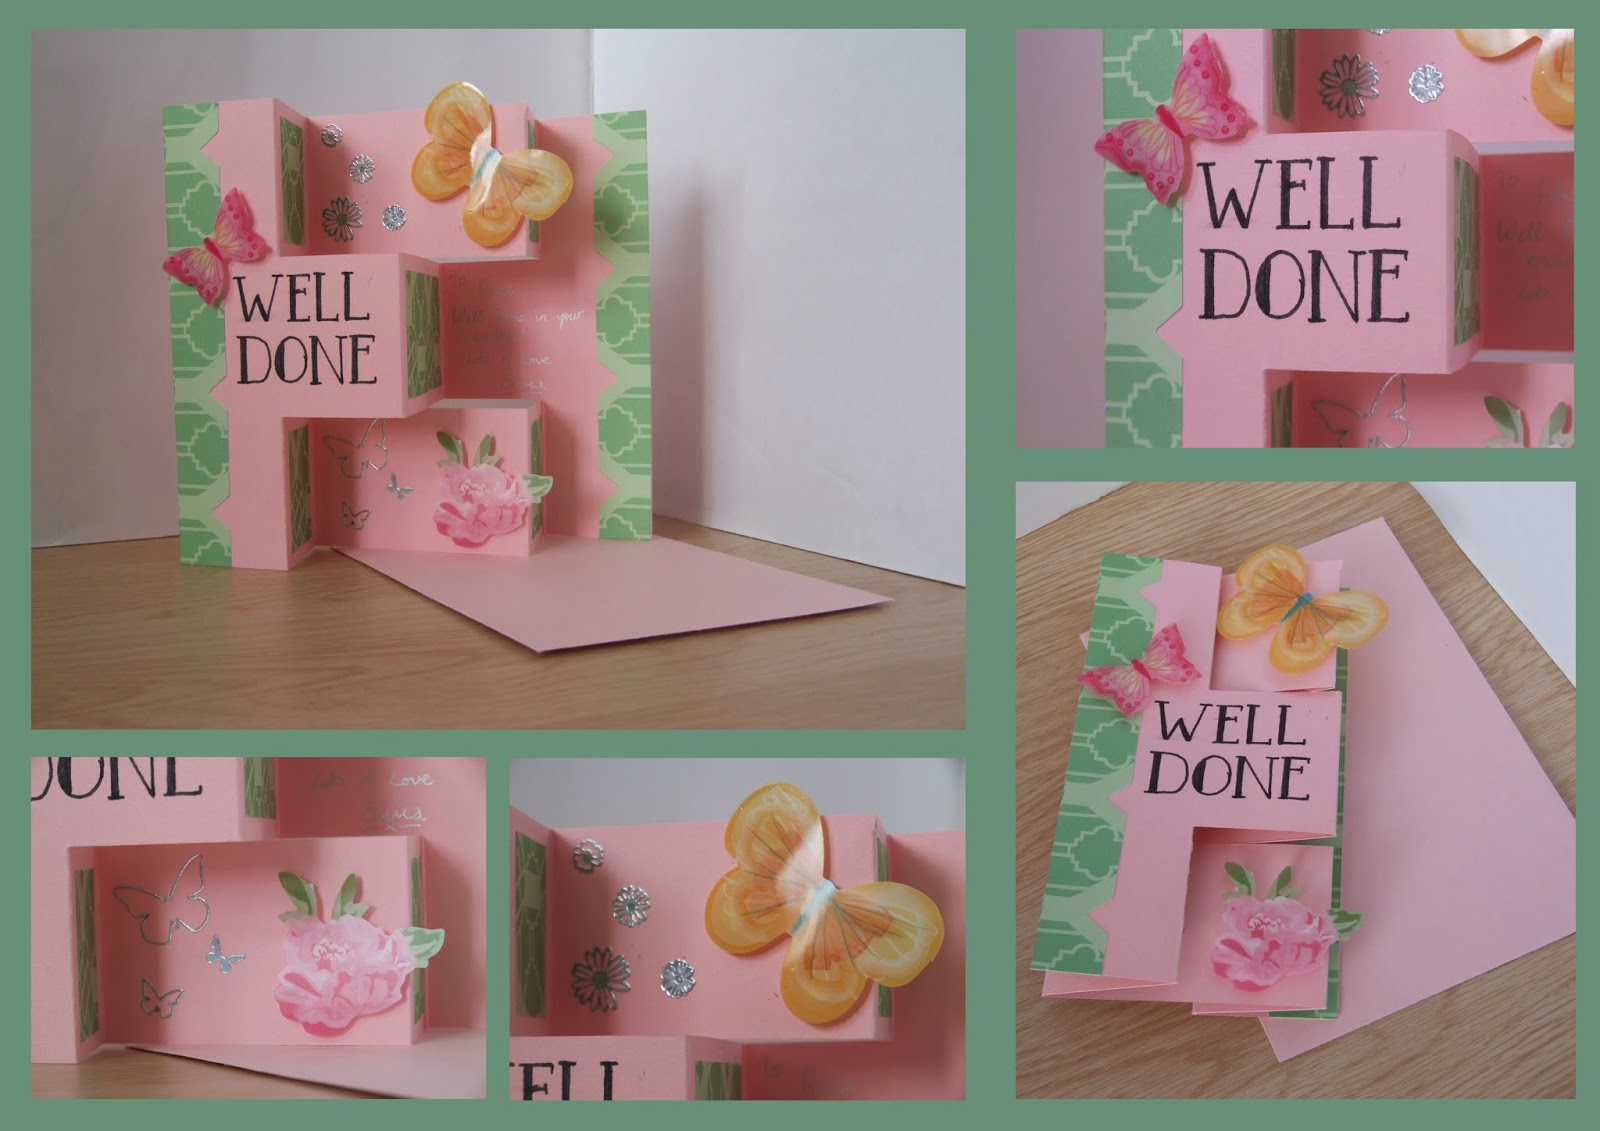
3D Cards: The Zig-Zag

My second 3D card was also a well done card but this time it was for my sister on receiving her GSCE results.

I used the same blog as last time for my inspiration although this time I opted for a zig zag card. I started with a sheet of pink cardstock which, after scoring and cutting in the appropriate places, I decorated with paper from the Retro Rose range by Llewelyn Bowen (ones I have used before and plan on using again and again.)

I also decorated the card with acetate butterflies and flowers, keeping with the colour scheme of pink, green and yellow. I added a bit of sparkle in the way of peel off flowers before handwriting the sentiment in a retro font.

I really liked the way the paper was already shaped at the edges; it made for an interesting border to the card. 

The written message for the card, you can probably just about make it out in the photo, went on the back panel of the card so that when it was closed, it was hidden behind the sentiment. Making 3D cards, I've realised, gives more scope for design by allowing you to create a new level. I not only have to think about what the card looks like on the front but also when it is closed - just out of the envelope - and when it is open - stood up on display. I wanted the butterflies to stand out a bit and in order to do that, I had to make sure that while they weren't sticking out too much that the card didn't fit in the envelope, they weren't hidden by the panel in front when the card was closed. It was a similar situation with the peel offs in that I didn't want to see them when the card was closed (this meant I had to do a bit of re shuffling)

Overall, I think this one was simpler than my previous one but that doesn't mean that it didn't have it's own design challenges!

Monday, 29 July 2013

The Craft Cube 5000

I am one of those people that can spend hours (and probably a lot of money) in shops that sell stationary and storage items. So, me making a Pinterest account last week was absolute heaven. 

As a student crafter, I have lots of stash and very little space, when I am at uni, and not much more when I am back at home (mainly due to the clutter in my room). So what I really need is a portable, small-ish storage unit that allows me to put as much of my stash as physically possible. Oh, and being a student and having little to no money, ridiculously cheap. Hmm. 

The model in it's former glory (I won't go
into details as to what it is)
So last week, as I was lying in bed about to go to sleep, I decided that I was going to actually sort out my room and organise my stash, with Pinterest being my source of inspiration. I had an old model from my first year of architecture that had no purpose but to sit on my shelf, gather dust and take up space so I resolved to use this somehow.

The following morning, several Pinterest pages at the ready (storage, craft storage, DIY storage, DIY craft storage, . . . ) I began sorting and making.

The first image of genius I found was a way of storing clear stamps . . . .using CD boxes! All you have to do it take out the interior (the actual CD part of the box) and put the stamps in. I was definitely having that idea - my stamp collection just kept building up and because all the sheets were different sizes, I had no real place to store them so they always took up lots of space. But now that I got hold of some CD cases, they are organised, compact and easy to get to.

As for my big storage project though, the first thing to do was actually get rid of the little model as I only wanted the wooden frame in order to make my box. I thought through several ideas, including just making some trays for everything to sit in. I wanted to make sure that as much of the space available was used and each section was designed to hold something specific. That way, it would be easy to find everything when I needed it as well as making the most of what was available. Already, I knew some of the things that were going to go into my box: my stamps in their new boxes, my ink pads and all my chipboard pieces.
Previously, all my chipboard shapes were in one box (the boxes used, gradually growing in size as my collection grew quicker than it shrunk!) which made for a right pain when I was either looking for something in particular or looking for inspiration. So I decided I was going to separate them and store them separately. In order to do this, I had to make some little drawers for them to sit in my frame.

I'll admit it was a little bit trick to get them to fit - with the frame being handmade as well (and being made by me, not exactly square). However, after a bit of trimming and a bit of force, I got the two draws to fit.

I went on to make a third drawer, this time to store paper and the peel off sheets that were living in my craft tote/caddy.

As for my stamps and the ink pads, the pads themselves fitted beautifully within the top of the frame and also allowed the perfect amount of space for the CD boxes to be stored next to them. I didn't have enough CD's to warrant using the whole side of the box for them so the space that was left was just right for my pens - both my Sharpies and my ProMarkers (more architecture than card making) as well as the odd gel pen and coloured pencils. The teeny tiny gap between my pens and inks allowed me to slot my stamping block in.

I had used card to turn the frame into a box but didn't want to waste the inch of space created by the frame. During my clear out, I came across several pairs of jeans that had worn away in awkward places and therefore couldn't be worn again so I cut these up and (kind of) neatening them up by hemming them, I creating pockets around the other three sides so that I could store card blanks and other bits and pieces.

The very last bit of my box was going to be a fourth drawer but was impatient to get it finished and didn't know what to actually put in it so I just left it as a shelf big enough to store some of my business-y bits - my order book, sketch book etc - although maybe in the future, I will do something with it. Who knows?

While it definitely is nowhere near shop quality - lack of wrapping paper (I ran out, ok!), my lack of ability to hem in a straight line and the tight fit of the drawers meaning I will be forever gingerly opening them so as not to break them - it is custom made for me and my craft stash. It's something that I would never be able to find in the shops and except the cost of the CD boxes and a tube of UHU, it was completely free. Not bad really then!

The finished box

Pockets made from old jeans create pockets for my card
blanks and papers as well as protect the sides

Stamp storage - my perfectly organised stamps in their
new home

From the top - ink pads, stamping block, pens and
pencils, stamps, business cards

The bottom two drawers organise my chipboard pieces,
top draw has paper and peel offs and the shelf has my
business bits

Friday, 10 August 2012

Card-lympics Day 15 and CAS-ual Friday

This week I have decided to cheat and do one post instead the two I would have done: one for the card-lympics and one for CAS-ual Fridays. But it isn't cheating too much as they are more or less the same card. 

So Card-lympics first

Today, the event was football and although I never really watch it, last year I caught the final of the women's World Cup (Japan vs USA) and I was hooked. So I did begin to take an interest in women's football. But anyway.
I chose to make a Digi-stamp for this card, making another character, similar to my Wimbledon girl. I had drawn the sketch for this a little while back but decided it would be perfect for this a got it sketched up, scanned and Photoshopped this morning. Instead of colouring it on the computer, however, I simply did the outline and printed the line drawing off to colour in with pencils. I would have had a go with ProMarkers but my colours are still limited.
I decorated the card with some patterned paper and added some peel-off flowers for that finishing touch.


CFC65


Card number 2.
This one had to be made using a square card blank (I wasn't going to use this as the Card-lympics card due to all my other cards being A6 and it was a bit to late to change the shape and mix it up a bit). So, I chose to use my new Digi stamp, again colouring it with pencils, and decorated the card with papers from the 'My Minds Eye' Collection. The tag was also from the papers and I decorated it with a simple peel-off message. Like my previous card, I kept the colours British but didn't want to copy the kit completely so I played around a bit.


Wednesday, 8 August 2012

Card-lympics Day 13

After our recent success at Greenwich, this card seems fairly apt. I had to rely on the BBC for a photo of the show jumping, although unfortunately it was one from the article about Nick Skelton missing out on a medal today. I guess it would be unfair if we won all of them!
Again, I opted for a silhouette card, but can you blame me? I didn't really want to paper piece a horse and its rider and getting the horse right was hard enough so I went for the shadows. I used dark orange paper to create the fence and added dimension to the card by raising the horse and front post on foam pads while simply gluing the rear post and fence to the card blank.
I felt this design was a more general design, in that this card could go to anyone who likes horses etc. whereas one of my other ones, say, the triathlon, is fairly specific. I could have left it with the figure but I decided to add a birthday peel-off. It's one that I had been looking to get rid off as it's not the style I would use at all but I think it really works well with this card, all the fences, and the whole arena for that matter, are decorated with lots of flowers and it just seemed to fit in.
I was also able to integrate the Union Flag into the design once again. Recently I've just had to stick it in the corner or somewhere neat as it didn't fit in with the image on the card but adding it to the fence post looks alright and seen as all the fencing at Greenwich are English themed, I figured I could get away with it!


Sunday, 5 August 2012

Card-lympics Day 10

We are well over half way through the Olympics now. Yesterday, now known as Super Saturday, was absolutely amazing! Three British gold medals in the space of 45 minutes and a couple more today, courtesy of Ben Ainslie and Andy Murray. We are on a roll!


Today's sport was hockey, field hockey to be more specific, and seeing as I hadn't played hockey since I was probably in year 8, my inspiration left much to be desired. My obvious design was the stick and ball and that's what I stuck with. I tried to make it a bit more interesting by adding some patterned paper as a background and finishing it off with a peel-off message but it's certainly not my best card-lympics entry.
The stick and ball were cut out from black card and outlined with gold pen, just to give it a bit extra.
Maybe tomorrow I won't leave it so late and give my creative juices time to flow properly.


Wednesday, 23 May 2012

Crafting in the Sunshine

Today, I was left with a dilemma. I don't know how the weather's been where you are, but here, it's be gorgeous. I have also just finished all of my university work so I have nothing to do except chill out. My dilemma was this: enjoy the sunshine, as I should seeing as the sun is rarely seen in the UK, let alone Manchester; or, spend the afternoon making cards. In the end I decided that if I couldn't bring the sunshine into my room, I would take my craft stash out to the sunshine. So, grabbing my beach towel and my kit and went and sat out in the garden at the front of my uni digs. 
 Overall, I had a rather pleasant and productive afternoon. The six cards I made today included an anniversary card for my parents, a new baby card (made using some of my German stash) and another card made using recycled materials, this time a Flake Easter egg box. 


 I was particularly pleased with the butterflies card. I had seen cards using little butterfly embellishments and only attaching the body of the butterfly to the card, leaving the wings stood up from the front, almost as if it was about to fly away. For the two butterflies, I used peel-offs on some patterned paper and then cut out the shape. I actually use foam pads to stick them to the card to really make them stand out. The smaller butterflies were made using a shaped punch and there were some other peel-offs as well. All that was left to do after that was glue a nice piece of paper to the front and add a message.