So if you follow my blog (and I thank you for doing so!) or if you've found me on facebook, you may have realised that I'm not exactly being productive on the card front at the moment. Third year architecture is definitely taking its toll and I am only finding time to write at the moment because I'm waiting for printing to happen (grrrr). But enough about architecture!
With horror, the other day I realised that I have around 20 days until university finishes for Christmas. And I had barely started my Christmas cards. And I have a lot to do this year due to the cohort of hikers that I have recently acquired!
I then decided that no matter what happens, I am going to make one Christmas card a day until the end of term which should give me enough cards to send to people. I started this on Sunday and am actually ahead of schedule despite not making any last night or the night before due to making more than one in an evening. The other benefit of this is making sure I get a break from stressing about architecture.
Speaking of stressing, I had a care package from home on Friday. I wasn't expecting it at all but when I opened it, my friends definitely gave me some funny looks. Glittery Christmas foam stickers have the same effect (if not a greater one) as chocolate!
Tonight however, with final crits out of the way, I am having a craft-fest. I am breaking out the chocolate and the Christmas paper and even the Christmas music! 7 hours and counting . . . .
Thursday, 21 November 2013
Wednesday, 13 November 2013
3D Cards: The Cascade
With it being a big birthday for my mum back in September, I of course had to do a special card and while looking for inspiration, I found a really unusual design that I just had to try.

When sorting through my craft stuff before I came back to uni, I found my oriental papers that I had completely forgotten about. This teamed with black card (because my stash of card stock is shocking), meant that I could create a really bold design. The red has got a bit of a pink tinge to it but I think it works really well. I accidentally cut both black pieces of card the same way even though they mirror each other. This meant that one side is white instead of black but I think it brightens the card up a bit rather than just having it completely black (well, you know what I mean!). I had some oriental peel-offs so I got to stick these to the paper and cut around them - a technique I really enjoy.
The message goes on a little piece of card that slots in the middle of the card. For this I just cut a rectangle of black card, decorated it with some patterned paper and finished it with a couple of peel-offs. Then, when it was time to write the message, I just used a white gel pen although I expect gold would also look really good.
I think I mixed my orientals with this card (tut tut) but apart from this, I would definitely say it's one of my favourite makes to date.
Thursday, 7 November 2013
Victoria Baths 3
Sunday saw me at the third bi-annual Victoria Baths Art and Craft Fair. I can't believe it's been a whole year since my first fair!
Unfortunately, I can't say that it was as successful as the first one - it wasn't through lack of people, just lack of buyers. (Although I would be tempted to see if the correlation is related to my brother manning my stall with me the first time, as none of them have been as successful . . .)
Despite the cold, I still had a good day, albeit long and tiring (although that was mainly due to still recovering from my Newcastle trip in the week).
One thing that I did begin to think about was when I was on my Hiking Club's table at the Freshers' Fair back in September (so long ago . . . .). As I had experience running a stall, I was more than happy to lead and I loved every second of it. I had lost my voice by the end of the first day and then again by the end of the second from shouting over the crowds and talking practically none stop for the two days.
But how is it that I was able to talk for Britain and get people to come over to our table and essentially 'sell' the club to them but I can barely say hello to people when I'm behind my table at a fair?
Surely it should be the same? I mean, hiking and card making are both things that I am passionate about, running a table is about engaging with the people browsing and at the end of the day I am trying to sell them something. I guess this is something that I need to work on . . . .
I've also been scolded by my friends for selling my cards too cheap. But that's for another time . . .
Wednesday, 23 October 2013
A Very Whovian Birthday
I can't believe how long it's been since I last blogged. I feel like I'm neglecting my card but I guess that's what happens in third year! I promise to get my balance right soon. In the meantime however, I have another 3D card to share.
After the diamond card I made for my brother (See here), I was commissioned one for a family friend. In the theme of Doctor Who. Now, being a Whovian myself, I couldn't wait to get started on this and it ended up being a very well thought out card (even if I say so myself).
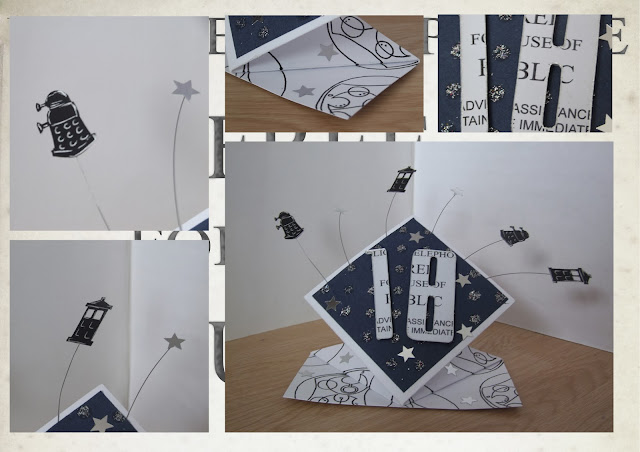
First thing's first, I had to dig though all my stash to find some TARDIS blue paper. Not only did I nail it but as you can see from the photo, it was also glittery. I printed out the police box notice in order to make the 18 for the front. This was outlined in silver and the front was decorated with stars (of course).
For the base, I'll admit, I had some help. My brother has been working on his Circular Gallifreyan so I asked if he would write out 'Happy Birthday' for me. Again, the stars came out.
The springy bits was where it got a bit fiddly. I used black card to make some tiny TARDIS's and Daleks, which I then, like my previous card, attached to wire. I added some detail with silver pen. The difference this time however, was that instead of sticking the wire to the back of the card, I stuck it between the card and the paper, which made it neater and left the back completely free for a message.
Any true Whovian (actually, that's a bit unfair because I know I wouldn't be able to spot it), may be able to spot a mistake in the card. There may also be a prize in it if you can tell me what it is. Just for giggles.
Sunday, 29 September 2013
3D Cards: The Zig-Zag
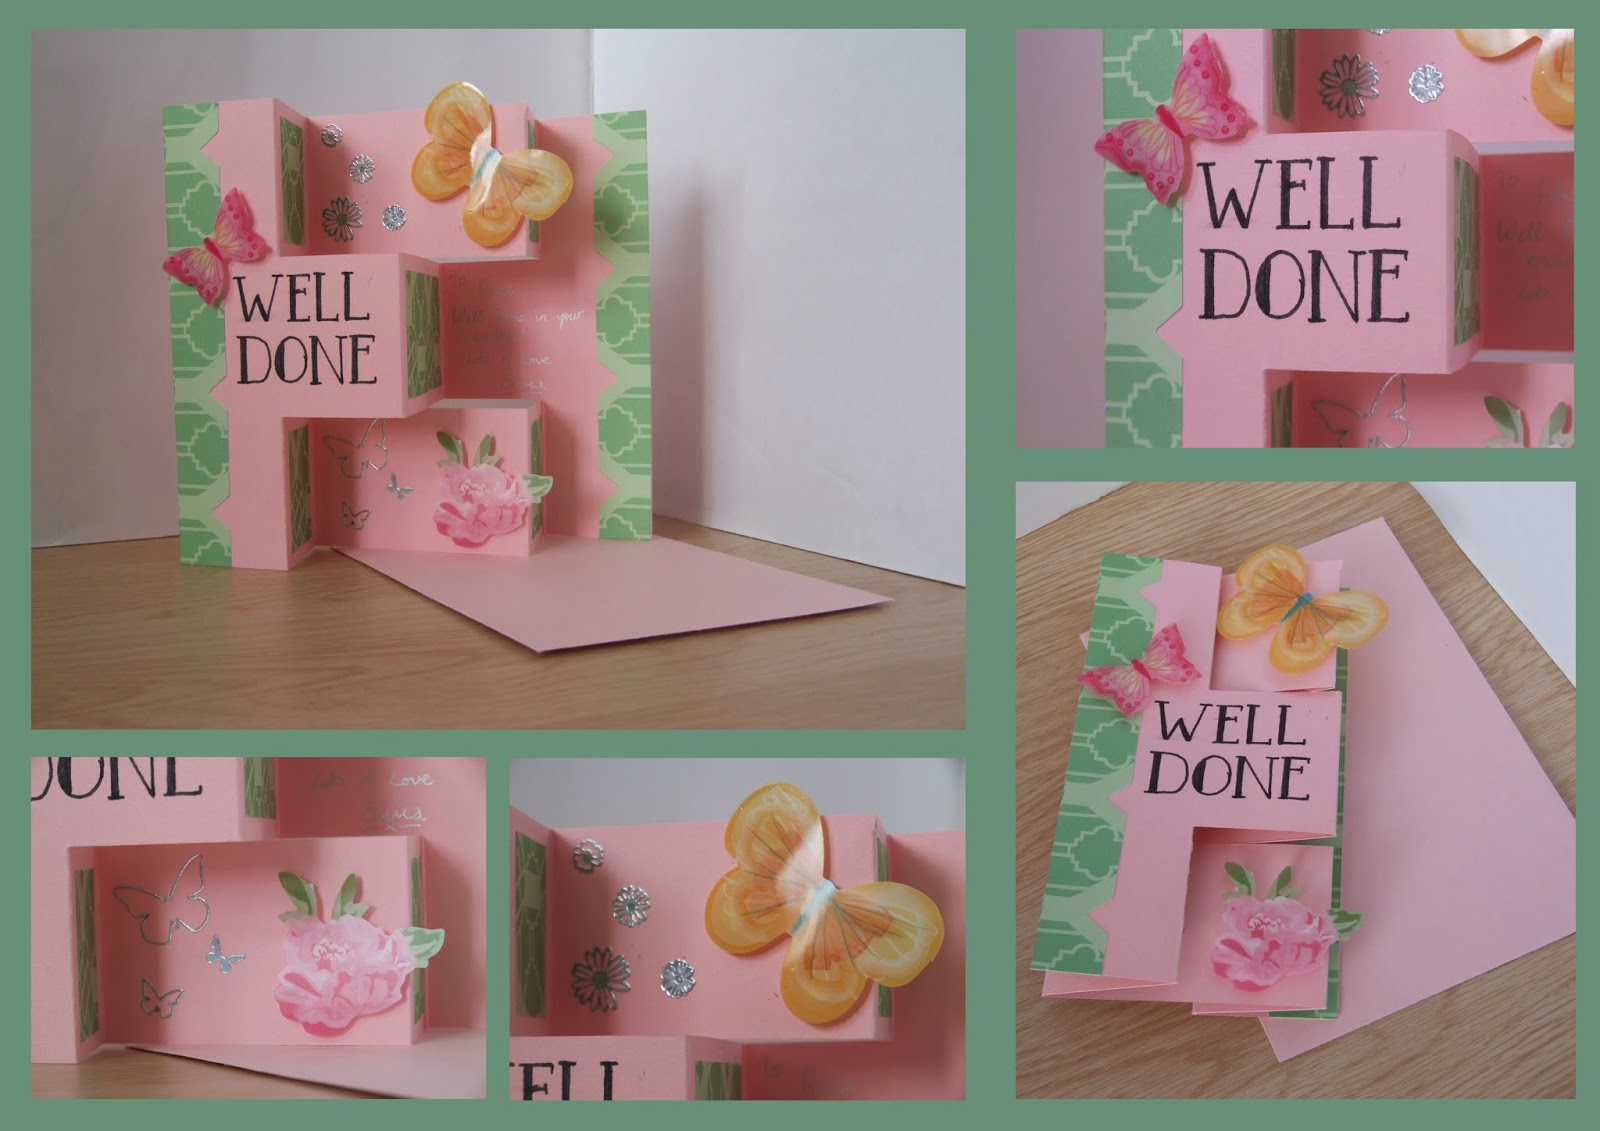
My second 3D card was also a well done card but this time it was for my sister on receiving her GSCE results.
 I used the same blog as last time for my inspiration although this time I opted for a zig zag card. I started with a sheet of pink cardstock which, after scoring and cutting in the appropriate places, I decorated with paper from the Retro Rose range by Llewelyn Bowen (ones I have used before and plan on using again and again.)
 I used the same blog as last time for my inspiration although this time I opted for a zig zag card. I started with a sheet of pink cardstock which, after scoring and cutting in the appropriate places, I decorated with paper from the Retro Rose range by Llewelyn Bowen (ones I have used before and plan on using again and again.)
I also decorated the card with acetate butterflies and flowers, keeping with the colour scheme of pink, green and yellow. I added a bit of sparkle in the way of peel off flowers before handwriting the sentiment in a retro font.
I really liked the way the paper was already shaped at the edges; it made for an interesting border to the card.
The written message for the card, you can probably just about make it out in the photo, went on the back panel of the card so that when it was closed, it was hidden behind the sentiment. Making 3D cards, I've realised, gives more scope for design by allowing you to create a new level. I not only have to think about what the card looks like on the front but also when it is closed - just out of the envelope - and when it is open - stood up on display. I wanted the butterflies to stand out a bit and in order to do that, I had to make sure that while they weren't sticking out too much that the card didn't fit in the envelope, they weren't hidden by the panel in front when the card was closed. It was a similar situation with the peel offs in that I didn't want to see them when the card was closed (this meant I had to do a bit of re shuffling)
Overall, I think this one was simpler than my previous one but that doesn't mean that it didn't have it's own design challenges!
Saturday, 14 September 2013
3D Cards: The Next Dimension
Those of you who read my last post (yes it was a month ago - sorry), you would have seen I had started dabbling in 3D cards, beginning with my easel card. Since then, I have made four more cards, using different techniques and over the next few posts, I'm going to be writing about them.
But before I go any further, credit where credit is due, I came across a great blog with tutorials for all sorts of 3D cards so if anyone is looking for some ideas, I recommend that you take a look over at Beccy's Place.
My first card was briefly mentioned in my previous post but I couldn't say any more at the time as it was going to be for my brother on receiving his A level results and getting into university, which he hadn't at the time and I didn't want to jinx it (he did really really well and is moving into his halls at Birmingham University next weekend).
 I should probably explain that he is off to study music and mathematics, which explains the music notes and the numbers. This card needed tutorials from Youtube but it is very similar to the Diamond Fold Card on the aforementioned blog.
The colours are the colours of the university and I used music patterned vellum to decorate the base. The dog stamp was from my magazine (where the original inspiration came from) and I used gold and blue stars to finish it off. I decided to go really over the top and I used wire to have springy notes, stars and numbers at the top of the card. The stamped sentiment needed my sister's opinion but felt it was appropriate for someone who is about to take their step out into the (semi-)real world. The idea was that as well as being a 'well done in your exams' card, it would also be a 'good luck at uni' card and would be something that he could take with him to put on his book shelf or desk.
You may be wondering where the message goes on a card like this? Well, it's not shown in these pictures but it is on the back of the card. The whole thing folds flat, allowing it to go into a normal envelope. A couple of things I would say, and I think I pushed this one to the limit, is make sure the folds are crisp in order for it to stand up and to make sure not to overload the diamond, again, for it to stand up. Too much weight, or not distributed enough, will stop it from standing up straight but this is something that is better shown than explained - a bit of experimentation is needed.
But before I go any further, credit where credit is due, I came across a great blog with tutorials for all sorts of 3D cards so if anyone is looking for some ideas, I recommend that you take a look over at Beccy's Place.
My first card was briefly mentioned in my previous post but I couldn't say any more at the time as it was going to be for my brother on receiving his A level results and getting into university, which he hadn't at the time and I didn't want to jinx it (he did really really well and is moving into his halls at Birmingham University next weekend).

The colours are the colours of the university and I used music patterned vellum to decorate the base. The dog stamp was from my magazine (where the original inspiration came from) and I used gold and blue stars to finish it off. I decided to go really over the top and I used wire to have springy notes, stars and numbers at the top of the card. The stamped sentiment needed my sister's opinion but felt it was appropriate for someone who is about to take their step out into the (semi-)real world. The idea was that as well as being a 'well done in your exams' card, it would also be a 'good luck at uni' card and would be something that he could take with him to put on his book shelf or desk.
You may be wondering where the message goes on a card like this? Well, it's not shown in these pictures but it is on the back of the card. The whole thing folds flat, allowing it to go into a normal envelope. A couple of things I would say, and I think I pushed this one to the limit, is make sure the folds are crisp in order for it to stand up and to make sure not to overload the diamond, again, for it to stand up. Too much weight, or not distributed enough, will stop it from standing up straight but this is something that is better shown than explained - a bit of experimentation is needed.
Wednesday, 14 August 2013
Easel Cards
Good Morning!
Recently I was inspired to make some Easel Cards. I had seen them before and don't get me wrong, the ones I saw looked amazing, but I felt that they weren't really my style and far to elaborate.
However, one of the projects in the latest issue of my magazine really inspired me to have a go. I even came up with a design then and there (but that's for another time, shhh). So, Sunday afternoon saw me scouring the internet searching for how to actually make these 3D cards and after sitting through a couple of YouTube videos and finding a couple of sites, I managed to make my first ever Easel Card.
 It was so simple to make and would allow me to start working my way through my massive pile of paper/card and the envelopes that are given back to me (nothing wrong with a bit of recycling here and there!). This card, as you can probably guess, is a triple easel card. I had some tall envelopes spare so I made it to fit one of those.
I cut some cardstock in half lengthways, meaning I can make two cards from one sheet of A4. Folded it in half lengthways and when I opened it up, folded on side lengthways again, so that the edge came to the middle. As this is a triple easel card, I cut to folded side into three up to the centre fold. And then all I had to do was decorate.
The only other bit you have to remember is a stopper on the base of the card which will hold the easels in place. I chose to stamp a floral image and used sticky pads to raise it up enough to hold the easels up. I've seen some where the sentiment is used as well.


I did struggle to decorate the card but that was mainly due to finding papers and embellishments that matched the cardstock I started with. In the end, I opted for some felt and paper flowers and a stamped faerie image, coloured in with pen. I'll admit I was lazy when adding the sentiment and decided to use a peel off rather than stamp on but I think the silver, along with the glitter on the flower and the tiny butterflies just finishes it off.
I also love the way that these cards just fold flat, ready to go in the envelope.
I might make a tutorial for these when I make my next Easel Card (which will be very soon).
Recently I was inspired to make some Easel Cards. I had seen them before and don't get me wrong, the ones I saw looked amazing, but I felt that they weren't really my style and far to elaborate.
However, one of the projects in the latest issue of my magazine really inspired me to have a go. I even came up with a design then and there (but that's for another time, shhh). So, Sunday afternoon saw me scouring the internet searching for how to actually make these 3D cards and after sitting through a couple of YouTube videos and finding a couple of sites, I managed to make my first ever Easel Card.

I cut some cardstock in half lengthways, meaning I can make two cards from one sheet of A4. Folded it in half lengthways and when I opened it up, folded on side lengthways again, so that the edge came to the middle. As this is a triple easel card, I cut to folded side into three up to the centre fold. And then all I had to do was decorate.
The only other bit you have to remember is a stopper on the base of the card which will hold the easels in place. I chose to stamp a floral image and used sticky pads to raise it up enough to hold the easels up. I've seen some where the sentiment is used as well.


I did struggle to decorate the card but that was mainly due to finding papers and embellishments that matched the cardstock I started with. In the end, I opted for some felt and paper flowers and a stamped faerie image, coloured in with pen. I'll admit I was lazy when adding the sentiment and decided to use a peel off rather than stamp on but I think the silver, along with the glitter on the flower and the tiny butterflies just finishes it off.
I also love the way that these cards just fold flat, ready to go in the envelope.
I might make a tutorial for these when I make my next Easel Card (which will be very soon).
Subscribe to:
Posts (Atom)