Showing posts with label 3D cards. Show all posts

Tuesday, 5 August 2014

Technique of the Week: Easel Cards

2014_0805-0048

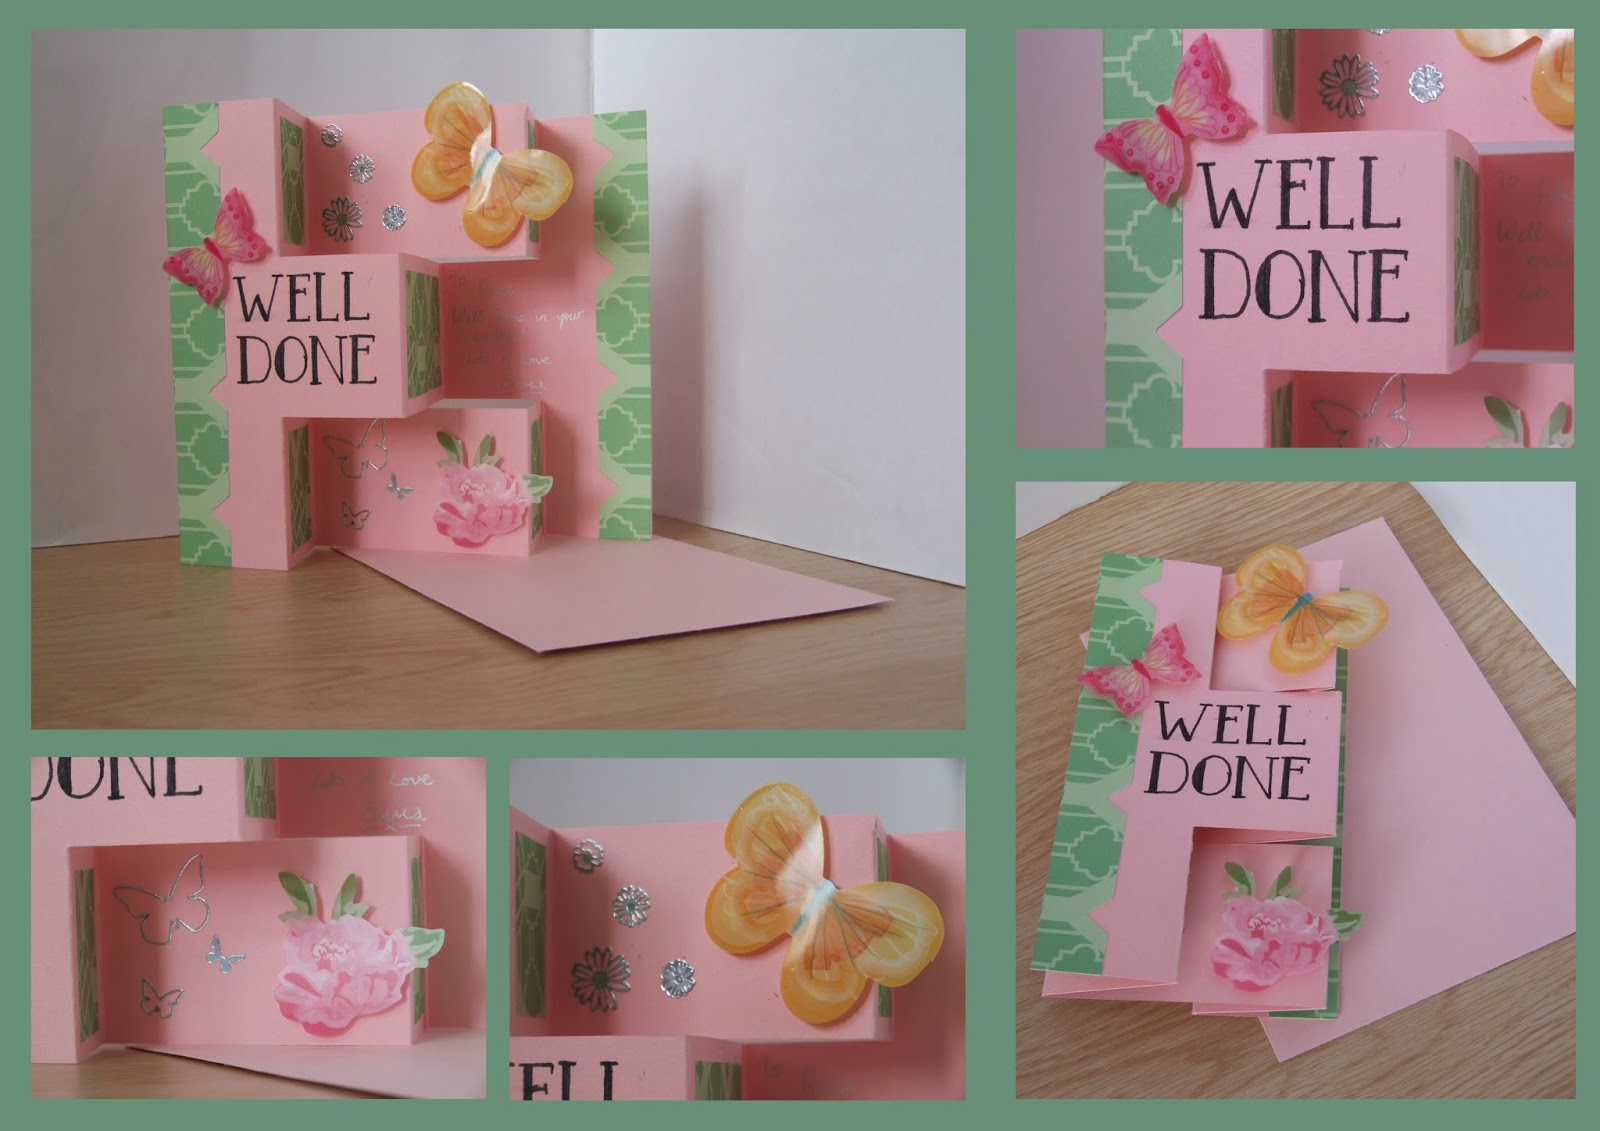
Last week, I received this card for my graduation. It was made by a family friend but sent from my Nanna. While I’ve seen easel cards several times in magazines and on websites and other blogs, I hadn’t actually come across one in real life. Easel cards never really seemed my kind of style, mainly due to all the borders and peel-offs and all sorts of embellishments and images, while mine tended to use paper piecing technique and a generally simpler design.

It’s not that often that I receive handmade cards so when I do, I like to examine every detail – how did they do that? what paper was used there? I’ve never done it like that before! – and this card was no exception. While I admit, it took me far longer than it should have for me to realise how the card worked (getting it to stand up), I was inspired by the simplicity of the structure and how effective it was. Cards like this are perfect for special occasions (significant birthdays, wedding anniversaries, weddings, graduation, etc.) because they are more than just a card and become a keepsake of sorts.

2014_0805-0052

I decided to have a go at making an easel card and was surprised (although I really shouldn’t have been) at how easy it was to make. I chose to use a card blank that I already had rather than make it from card stock but all I had to do was trim it down to make it into a square blank and fold the front diagonally to make the easel. To make the front of the card, I cut a square of white card to match the size of my easel. The nice thing I found about using a card blank was that it had different colours on each side of the card and by turning the blank inside out, I could have a coloured base.

In honour of the Great British Bake Off starting tomorrow (who else is as excited as I am????), I chose to do a cupcake themed card. The papers were courtesy of 2014_0805-0057Papercraft Inspirations (of course) and fitted my theme perfectly. Another great thing about using card blanks is that they come with matching envelopes, which saves me having to root through my ever growing pile of recycled envelopes trying to find one that is both the right size and colour. Because the card blank has been trimmed, it does leave space in the envelope but this can be taken advantage of by not restricting the design of the card to the dimensions of the front – I added a little tab as a final flourish.

Having seen for myself how simple these cards are to make and having a few more special occasions coming along soon, I will no doubt be giving easel cards another go in the near future.

2014_0805-00542014_0805-00552014_0805-0056

Wednesday, 5 March 2014

A Climbing Commission


This birthday card was commissioned by the recipient of my hiking card for a fellow hiker and climber. The idea was that it was the same style as my previous one, except that this one would be a climber instead of a hiker. 

Not being a climber myself (at the time) I knew very little about the technical side of it - having now had a go, I realise the error of my ways but it's another card I'm proud of. The birthday girl also has a German Shepherd so it was requested that one made an appearance. I'm really pleased with the way the twine resembles climbing rope however, I would like to stress that this is NOT how you climb!

As with the previous card, this one is a zig zag and finished with a brown paper rock face. The climber and her dog are paper pieced and finished off with twine and a birthday peel-off sentiment.

Tuesday, 31 December 2013

Saaaaaayyyyuuuuuul!!!


My dad likes his rugby. I've been to a couple of matches as well. For his birthday, I decided to make him a card in the theme of his team: Sale Sharks. 
It's one of my more simple cards, using a stepper base, I paper cut the Sharks logo from some white card to put on the front. I like the dimension that the stepper card creates, I used this to my advantage with a set of posts and a rugby ball, giving the impression that the ball is about to be kicked half way down the pitch.
I finished is simply with a peel off sentiment.

Monday, 30 December 2013

A Card for a Potterhead

Having just blogged about my hiking birthday card, and my Wicked birthday card for that matter, I realised that I completely forgot to write about my sister's birthday card back in October. To call her a bit of a Potterhead would be the understatement of 2013.


Some of the inspiration for this card came from a small business called Paper Panda who makes the most intricate paper cuttings and I thought I'd give it a go. 
I used a zig-zag card again, with the back of the card a silhouette of Hogwarts. I used my sneaky powers of detection to find out which house she was in and made this the colour scheme of the card, as well as providing the design for the central fold. 
Like with my Wicked card, I was running short of ideas so for the front, along with the sorting hat and a birthday sentiment, I went crazy with a few stars.

My favourite bit is definitely the silhouette. I'm really pleased with it but it was hard going although I can now say that I've done it and I really do know how much work goes into what Paper Panda produces - and mine isn't even anywhere near the scale her work is on! I may do more paper cutting in the future but I definitely think that paper piecing is my thing.

Hiking + Card making = Very Happy Emma

I'm really falling behind with these cards! This one dates back to the beginning of November. One of my best friends is really into hiking. I'm also really into hiking but he's REALLY into hiking. So a hiking themed card had to be done. The zig-zag card was perfect for this because is meant that I could create different levels of the card, in the same way that the land changes when you're climbing a mountain.

We had climbed Helvellyn (for me, it was the first time) a couple of weeks prior to his birthday so Swirral Edge was still fresh in my mind and this is what I based it on, complete with trig point. Impressively (or obsessively) on his part or mine, he guessed that it was Helvellyn. I added a paper person scrambling along the edge and as he loves his German Shepherd, she had to go in somewhere as well.
The compass was an afterthought. I wasn't sure whether it would be too much but I think it works well and helps to get rid of some of the grey. This was simply drawn on with pen and finished with a paper needle. To complete the card, I just added a birthday sentiment.

I loved making this card although I did get a little bit obsessive about it and spent most of an evening making it but I had never combined my two hobbies before (I don't think card making on top of a mountain is ever going to happen!) so I think I'm allowed to. 

He loved the card (although I think a lot of it was due to it having his dog on the front!) and a few weeks back, he commissioned me a couple of other cards, one of which based on this one, but those will have to wait a little while longer . . . 

Friday, 29 November 2013

A Wicked 21st

This year saw me and one of my closest friends turn 21 in the space of 2 days. In order to celebrate properly, we bought tickets to see Wicked as it was in Manchester at the time. Obviously, I had to make her a Wicked themed card.
I had never seen the musical before or read the book so all I had to go on was the poster and the limited knowledge I had of the story - it is essentially the prequel to the Wizard of Oz. It didn't give me much to go on.

I ended up using the poster for inspiration. I used black card stock to make a stepper blank but used green card to create the background and Elphaba's face. I didn't want to just re create the poster so I added a couple of my own touches such as glittery lips and using foam pads to make her had stand out from the card as well as over the edges.
I still needed to finish it off and my solution to problems like that is now to just add stars and glitter. Works everytime - this time in particular! The 21 was simply cut out from white card and I tried to use the same font that the poster uses. I finished it off with a peel-off sentiment.


She loved the card. And we both absolutely loved Wicked. Cannot wait to see it again!

Wednesday, 13 November 2013

3D Cards: The Cascade

With it being a big birthday for my mum back in September, I of course had to do a special card and while looking for inspiration, I found a really unusual design that I just had to try.


When sorting through my craft stuff before I came back to uni, I found my oriental papers that I had completely forgotten about. This teamed with black card (because my stash of card stock is shocking), meant that I could create a really bold design. The red has got a bit of a pink tinge to it but I think it works really well. I accidentally cut both black pieces of card the same way even though they mirror each other. This meant that one side is white instead of black but I think it brightens the card up a bit rather than just having it completely black (well, you know what I mean!). I had some oriental peel-offs so I got to stick these to the paper and cut around them - a technique I really enjoy.

The message goes on a little piece of card that slots in the middle of the card. For this I just cut a rectangle of black card, decorated it with some patterned paper and finished it with a couple of peel-offs. Then, when it was time to write the message, I just used a white gel pen although I expect gold would also look really good.

I think I mixed my orientals with this card (tut tut) but apart from this, I would definitely say it's one of my favourite makes to date.


Wednesday, 23 October 2013

A Very Whovian Birthday

I can't believe how long it's been since I last blogged. I feel like I'm neglecting my card but I guess that's what happens in third year! I promise to get my balance right soon. In the meantime however, I have another 3D card to share.

After the diamond card I made for my brother (See here), I was commissioned one for a family friend. In the theme of Doctor Who. Now, being a Whovian myself, I couldn't wait to get started on this and it ended up being a very well thought out card (even if I say so myself).


First thing's first, I had to dig though all my stash to find some TARDIS blue paper. Not only did I nail it but as you can see from the photo, it was also glittery. I printed out the police box notice in order to make the 18 for the front. This was outlined in silver and the front was decorated with stars (of course).
For the base, I'll admit, I had some help. My brother has been working on his Circular Gallifreyan so I asked if he would write out 'Happy Birthday' for me. Again, the stars came out.
The springy bits was where it got a bit fiddly. I used black card to make some tiny TARDIS's and Daleks, which I then, like my previous card, attached to wire. I added some detail with silver pen. The difference this time however, was that instead of sticking the wire to the back of the card, I stuck it between the card and the paper, which made it neater and left the back completely free for a message.

Any true Whovian (actually, that's a bit unfair because I know I wouldn't be able to spot it), may be able to spot a mistake in the card. There may also be a prize in it if you can tell me what it is. Just for giggles.

Sunday, 29 September 2013

3D Cards: The Zig-Zag

My second 3D card was also a well done card but this time it was for my sister on receiving her GSCE results.

I used the same blog as last time for my inspiration although this time I opted for a zig zag card. I started with a sheet of pink cardstock which, after scoring and cutting in the appropriate places, I decorated with paper from the Retro Rose range by Llewelyn Bowen (ones I have used before and plan on using again and again.)

I also decorated the card with acetate butterflies and flowers, keeping with the colour scheme of pink, green and yellow. I added a bit of sparkle in the way of peel off flowers before handwriting the sentiment in a retro font.

I really liked the way the paper was already shaped at the edges; it made for an interesting border to the card. 

The written message for the card, you can probably just about make it out in the photo, went on the back panel of the card so that when it was closed, it was hidden behind the sentiment. Making 3D cards, I've realised, gives more scope for design by allowing you to create a new level. I not only have to think about what the card looks like on the front but also when it is closed - just out of the envelope - and when it is open - stood up on display. I wanted the butterflies to stand out a bit and in order to do that, I had to make sure that while they weren't sticking out too much that the card didn't fit in the envelope, they weren't hidden by the panel in front when the card was closed. It was a similar situation with the peel offs in that I didn't want to see them when the card was closed (this meant I had to do a bit of re shuffling)

Overall, I think this one was simpler than my previous one but that doesn't mean that it didn't have it's own design challenges!

Saturday, 14 September 2013

3D Cards: The Next Dimension

Those of you who read my last post (yes it was a month ago - sorry), you would have seen I had started dabbling in 3D cards, beginning with my easel card. Since then, I have made four more cards, using different techniques and over the next few posts, I'm going to be writing about them.

But before I go any further, credit where credit is due, I came across a great blog with tutorials for all sorts of 3D cards so if anyone is looking for some ideas, I recommend that you take a look over at Beccy's Place.

My first card was briefly mentioned in my previous post but I couldn't say any more at the time as it was going to be for my brother on receiving his A level results and getting into university, which he hadn't at the time and I didn't want to jinx it (he did really really well and is moving into his halls at Birmingham University next weekend).


I should probably explain that he is off to study music and mathematics, which explains the music notes and the numbers. This card needed tutorials from Youtube but it is very similar to the Diamond Fold Card on the aforementioned blog. 
The colours are the colours of the university and I used music patterned vellum to decorate the base. The dog stamp was from my magazine (where the original inspiration came from) and I used gold and blue stars to finish it off. I decided to go really over the top and I used wire to have springy notes, stars and numbers at the top of the card. The stamped sentiment needed my sister's opinion but felt it was appropriate for someone who is about to take their step out into the (semi-)real world. The idea was that as well as being a 'well done in your exams' card, it would also be a 'good luck at uni' card and would be something that he could take with him to put on his book shelf or desk.
You may be wondering where the message goes on a card like this? Well, it's not shown in these pictures but it is on the back of the card. The whole thing folds flat, allowing it to go into a normal envelope. A couple of things I would say, and I think I pushed this one to the limit, is make sure the folds are crisp in order for it to stand up and to make sure not to overload the diamond, again, for it to stand up. Too much weight, or not distributed enough, will stop it from standing up straight but this is something that is better shown than explained - a bit of experimentation is needed.

Wednesday, 14 August 2013

Easel Cards

Good Morning!

Recently I was inspired to make some Easel Cards. I had seen them before and don't get me wrong, the ones I saw looked amazing, but I felt that they weren't really my style and far to elaborate. 

However, one of the projects in the latest issue of my magazine really inspired me to have a go. I even came up with a design then and there (but that's for another time, shhh). So, Sunday afternoon saw me scouring the internet searching for how to actually make these 3D cards and after sitting through a couple of YouTube videos and finding a couple of sites, I managed to make my first ever Easel Card.

It was so simple to make and would allow me to start working my way through my massive pile of paper/card and the envelopes that are given back to me (nothing wrong with a bit of recycling here and there!). This card, as you can probably guess, is a triple easel card. I had some tall envelopes spare so I made it to fit one of those.
I cut some cardstock in half lengthways, meaning I can make two cards from one sheet of A4. Folded it in half lengthways and when I opened it up, folded on side lengthways again, so that the edge came to the middle. As this is a triple easel card, I cut to folded side into three up to the centre fold. And then all I had to do was decorate.

The only other bit you have to remember is a stopper on the base of the card which will hold the easels in place. I chose to stamp a floral image and used sticky pads to raise it up enough to hold the easels up. I've seen some where the sentiment is used as well.


I did struggle to decorate the card but that was mainly due to finding papers and embellishments that matched the cardstock I started with. In the end, I opted for some felt and paper flowers and a stamped faerie image, coloured in with pen. I'll admit I was lazy when adding the sentiment and decided to use a peel off rather than stamp on but I think the silver, along with the glitter on the flower and the tiny butterflies just finishes it off.

I also love the way that these cards just fold flat, ready to go in the envelope.

I might make a tutorial for these when I make my next Easel Card (which will be very soon).